Tuesday, June 24, 2008

Mengubah Domain blogspot.com menjadi co.nr

. Tuesday, June 24, 2008
0 comments

Untuk rekan-rekan yang sudah mencoba menggunakan dot.tk pasti menemukan beberapa kelemahan berupa pemasangan iklan di atas atau dibawah header tempat blogger kita. Untuk itu saya kirimkan artikel cara pembuatan domain gratis dengan mendaftar ke co.nr sehingga nama domain kita berubah menggunakan co.nr saja.

Pertama-tama yang perlu anda lakukan adalah menjadi member terlebih dahulu ke http://www.freedomain.co.nr/ nah disitu anda akan menjumpai tampilan sebagai berikut :


Masukkan alamat web baru anda yang nantinya akan menjadi co.nr misalnya http://budi.blogspot.com menjadi http://budi.co.nr saja setelah itu cek ketersediaan.

Jika sudah diterima tugas and selanjutnya mengisi beberapa formulir isian yang wajib anda isi, dan ingat jangan sampai salah.

Saya pikir langkah-selanjutnya pasti bisa deh yang penting untuk melihat berhasil atau tidaknya anda liat di alamat E-mail anda nanti disana akan ada kode activation yang diberi oleh pihak co.nr untuk mengaktifkan domain baru anda....selamat mencoba


Klik disini untuk melanjutkan »»

Sharing data di internet

.
0 comments

Tujuan dari teknik ini adalah untuk berbagi akses kepada user lain pada suatu folder yang anda inginkan. Anda bisa memilih kepada user mana saja yang bisa atau boleh mengakses folder anda dan juga bisa memberikan akses kepada semua orang yang ada pada jaringan atau network anda.


Langkah atau tahap sharing folder di windows 98/me/2000/xp :
1. Klik kanan pada folder yang anda ingin sebarkan aksesnya.
2. Pilih 'sharing' atau 'sharing and security'
3. Pilih 'share this folder to the network' pada windows xp atau langsung menentukan folder display name.
4. Pilih siapa saja atau user mana saja yang berhak mengakses folder anda dan tipe hak aksesnya. Pilih full access jika orang lain anda bolehkan untuk melakukan edit data maupun menghapus serta menambahkan file pada folder yang disharing. Pilih read only jika orang lain hanya boleh lihat-lihat atau mengkopi file saja.
5. Pilih Ok jika anda telah melakukan pilihan.

Klik disini untuk melanjutkan »»

Download Video dari Youtube.com

.
0 comments

Dulu pertama kali mendengar situs: www.youtube.com, yang terbenak dalam pikiran adalah aduh gimana ya cara download video dari youtube ! Aku dulu pernah baca - baca artikel caranya adalah dengan converter online, dulu aku pake’ vixy.net, tapi kendala yang dihadapi disini adalah kita dua kali kerja. Waktu terbuang untuk convert online dari format flv ke format yang lain, setelah proses convert selesai kita perlu mendownload movies tersebut, lama banget apalagi kalo menggunakan jasa warnet, terkadang mahal dan kecepatan rendah, pokoknya bikin males klo download dari youtube.


Namun akhir - akhir ini aku membaca artikel yang membuat pandanganku selama ini terhadap download di youtube berubah. Caranya sangat sederhana banget kok, langkah – langkahnya seperti ini :
  1. Cari video yang ingin didownload dengan membuka situs: www.youtube.com
  2. klo sudah ketemu,cari link video dengan cara arahkan kursormu diatas gambar videonya untuk pengguna Internet Explorer klik kanan, kemudian klik properties, akan muncul link di address tinggal di copy aja! Untuk pengguna Konqueor, mozilla, opera, netscape intinya sama yaitu copy link videonya !
  3. Buka situs keepvid.com , nanti akan muncul kotak isian link yang masih blank, paste link yang telah dicopy pada langkah ke dua diatas!
  4. Situs ini adalah juga dapat meng-generate link selain dari youtube, maka untuk pilihan situs ganti menjadi youtube.
  5. klik tombol untuk meng-generete, 1 detik ( atau 5 detik lah klo koneksinya agak lambat) kemudian akan muncul direct link untuk mendownload video yang kita inginkan kemudian tinggal di Copy.
  6. Paste direct link yang telah kita Copy ke Browser atau klo ingin lebih cepat pake aja download tool seperti IDM atau Orbit Downloader ( Disarankan pakai orbit, karena gratis dan tidak ada unsur merugikan pihak lain ).
  7. Nunggu download selesai dengan makan kacang, atau jika anda jerawatan bisa dengan makan permen …:)

Pekerjaan yang gampang bukan ! namun terasa susah jika anda tidak mengetahui triknya. Sebelum undur diri seperti biasa seperti penulis yang bijak akan menyampaikan sedikit pesan! Sekali lagi Tips ini hanya sebagai pembelajaran, penulis tidak bertanggung jawab atas penyalahgunaan artikel ini, tanggung jawab moril kami kembalikan kepada pembaca yang budiman.


Klik disini untuk melanjutkan »»

Saturday, June 7, 2008

Sophos JEEFOGUI – Powerful tool to remove W32:Jeefo

. Saturday, June 7, 2008
0 comments

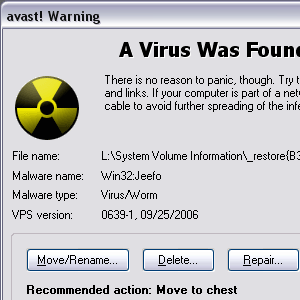
Woww!! What else can I say about this tool!!! Sophos JEEFOGUI is the powerful tool to remove, repair and stop the troublesome W32:Jeefo virus from running in your system. Full thanks and credits to whoever behind the development of this handy software. Yea, it’s totally free to use.

If you have no idea about W32:Jeefo virus, I will tell you a little bit info about it. W32:Jeefo infects all of Windows PE executables with an extension of .EXE and a filesize greater than 102,399 bytes, in all folders of all fixed drives C: to Z:. Other than that, it runs continuously in the background, infecting files at periodic intervals with no mercy.


Take a look at the screenshot below (I used Avast Antivirus to scan all my drives):-

It was really annoying and pissed me off. For those who have the same experience like me and don’t know how to get rid of it might be take a painful step to format drive C: and delete manually all the .exe files. And after that, they have no choice but to reinstall all Windows, drivers, software and they have to download all their favorite games including Pac Man (maybe).

Ok, this is how I get rid of W32:Jeefo using JEEFOGUI.

Step 1

Stop the antivirus software from scanning and close it. Download JEEFOGUI.com tool (Yes, it has .com extension). Run this software and click Accept.

Note: JEEFOGUI.com will delete the file SVCHOST.EXE, disinfect all infected files and remove the registry entries.


Step 2

You will see a simple interface and without wasting any time, click on the green GO button to start scan all your drives. It will start detecting infected files and at the same time, it will repair/remove/disinfect the infected files automatically. See image below:-


Step 3

Close JEEFOGUI after it already finished scanned and disinfected the files. Ok, now we have to turn off the System Restore.

Note: This will delete any previously created restore points.

For Windows XP user (I’m not really sure for Win 98/ME user), simply go to your Desktop > right click on My Computer icon > Properties and select the System Restore tab (or Windows+Pause/Break and select System Restore tab). Now check the Turn off System Restore on all drives checkbox, click Apply and click Yes. See image below:-

After that uncheck that same checkbox (to turn it on), click Apply and click OK. See image below:-

Restart your computer. DONE.

Right now, you can run all your program/.exe files without any worries. Yeahh..that’s all!

Optional: You can use Sophos Anti-Virus to protect your computer against the latest viruses.

Download Sophos Antivirus.

Klik disini untuk melanjutkan »»

CCleaner - Clean up junk files and invalid Registry entries

.
0 comments

Yeahh..the title says it all. CCleaner is a freeware system optimization and privacy tool. It removes unused files from your system - allowing Windows to run faster and freeing up valuable hard disk space.


I've installed and used this software. Yea..it's really fast and taking less than a second to run. Beside that, it will prompt you to save your Registry first if you want to fix or delete them.


Cleans the following:
  • Internet Explorer Cache, History, Cookies, Index.dat.

  • Recycle Bin, Temporary files and Log files.

  • Recently opened URLs and files.

  • Third-party application temp files and recent file lists (MRUs).
    Including: Firefox, Opera, Media Player, eMule, Kazaa, Google Toolbar, Netscape, Office XP, Nero, Adobe Acrobat, WinRAR, WinAce, WinZip and more...

  • Advanced Registry scanner and cleaner to remove unused and old entries.
    Including File Extensions, ActiveX Controls, ClassIDs, ProgIDs, Uninstallers, Shared DLLs, Fonts, Help Files, Application Paths, Icons, Invalid Shortcuts and more... Backup for registry clean.

  • Windows Startup tool.

Hmm..I think that's all for today..

Klik disini untuk melanjutkan »»

How to delete image or picture in Blogger?

.
0 comments

"Oppsss...I have uploaded a wrong picture!! &^%#&#!!" Yeah..it sounds familiar. It also happened to me. It's not a big deal if you've upload a 100kb or 300kb image. But, how about 3mb or 5mb? As we know, Blogger only provide 1024mb free space to store your picture.

Of course, you can delete your new post including the image that you have just uploaded. Then, how about the old posts? Do you want to delete them just because it has the photo of your old fashion hair style??


No worries guys. Normally all images that we have uploaded was stored in the blogger.com database. And the only way (I guess) to access all of them is in the Picasa Web Album. Just open that link. You'll see the Albums based on how many blog you've created. If you have created 3 blogspot blog using the same account, then you should have 3 Albums.


If you still confuse on how to use the Picasa Web Album to delete your image, just follow these simple steps:-

Step 1

Click to your blog's Album which you want to delete a picture on it. You may see something like below:-

Note: If you want your image to display a little faster, just click on the Size: Small Thumbnails (on the right side of the page)


Step 2

Click on the image that you want to delete. The image should be in a single page right now. Go to the right sidebar menu and click Delete this photo.

You will see a confirmation message. Press Ok to delete your picture. DONE.

Note: The picture will no longer appear in your blog.

This step was useful if you only want to delete one image. If you want to delete a multiple images, go to Organise (image on step 1). Then you will see a thumbnails images. Hold down the Ctrl key and click on multiple photos to select them. After that click the Delete button. As simple as that.

The advantage of deleting your image is that you can save a lot of space in your blogger account. Another good tips to save your image space is try to use the .gif file format instead of .bmp and resize your image to 300x300px or 400x400px.

From May 23, 07 until now, I'm currently using 5MB (0.56%) of my 1024 MB storage with 257 uploaded photos.

That's all for today!!!

Klik disini untuk melanjutkan »»

Blogger - How to make a clickable post titles?

.
0 comments

If you're using a classic Blogger template like me, you will notice that you cannot click the post title to go to the post page. Luckily, there is a little trick which you can apply to make your post title to be clickable. I've applied it in this blog. Try to visit my homepage and click on my post title. Hehe..


Ok, simply follow these tips:-


For New Blogger:-

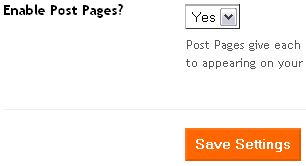
It's pretty simple for New Blogger. Just go to your Dashboard. Go to Settings > Archiving > and Enable Post Pages? set to Yes. Click Save Settings button. DONE.

Go to your blog and refresh them. By now your post titles should be clickable.

For Classic Blogger:-

Step 1

First thing first enable your post pages. Go to Dashboard > Settings > Archiving > and Enable Post Pages? set to Yes. Click Save Settings button. (see image above)

Step 2

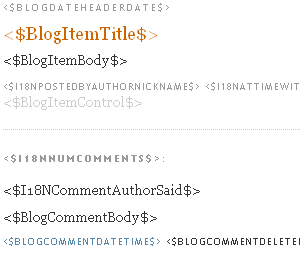
Then go to your Edit HTML page. Dashboard > Template > Edit HTML. Find this code:-


" title="external link">

<$BlogItemTitle$>


Ok, now replace them with this code:-


" title="<$BlogItemTitle$>">
<$BlogItemTitle$>


Save your template and DONE. Refresh your blog and by now you should have a clickable post titles.

I think that's for all for now. Hope this tip will be useful for you guys. Yeahh!!

Klik disini untuk melanjutkan »»

Blogger - How to list archive pages by title?

.
0 comments

Ok, today I'd like to show you how to list the archive pages by title in Blogger. If you browse through one of my archive page, you'll see that it will only list my blogger post title and the date instead of full content of my post (main content, time, no. of comment, etc)

And of course, you can follow the instruction on how to do this in the original article on Blogger Help. But wait, I've followed all through the steps and guess what, I got some errors in the post page.


This is how it looks like:-


If you don't want to end up with some errors like above, simply follow my instruction on how to list your archives page by title. Hehe..

Please make sure you backup your template first in case you mess up with template code.

For New Blogger

This feature is currently not available for New Blogger (layout)


For Classic Blogger

Step 1

Ok, first, go to your Dashboard > Settings > Formatting. Scroll down and set Show Title field to Yes. Click the Save Settings button at the bottom.


Step 2

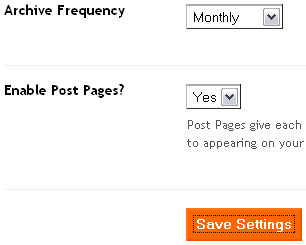
Then go to Dashboard > Settings > Archiving. Set Archive Frequency to Monthly and Enable Post Pages? to Yes. Click the Save Settings button.


Step 3

Go to Dashboard > Template > Edit HTML. Scroll down on the code area until you see this tag:-


....
....
....


Step 4

Now, copy everything between and tag including the tag itself and paste below it. You should have something like below:-


....
....
....


....
....
....


As you can see, we have two duplicate codes. Don't worry about it. We now call it code #1(the first one) and code #2(the second one).


Step 5

Carefully, add the tag before code #1 and at the end of it add

You should have something similar as below:-


....
....
....


Step 6

After that, add the tag before code #2 and at the end of it add

You should have something similar as below:-


....
....
....


And in the source code view, you should have something like this:-


....
....
....


....
....
....


Step 7

Now, for the important part, look closely in code #2. You'll see the other and tag inside it. Carefully, remove it.


....
....
....


...
...
...


Remove the one that have red in color. Remember, just remove the tag.


Step 8

Ok, now for the interesting part. Copy this code below and paste it below code #2.


Archive for <$BlogPageTitle$>


<$BlogDateHeaderDate$>


" title="<$BlogItemTitle$>">
<$BlogItemTitle$>


Right now you should have something similar like this in your HTML code view:-

....
....
....


....
....
....


....
....
....


....
....
....


....
....
....

Save your template and DONE. You can see how it looks like on my archive page for January 2008.

But why do you need to list them in title? For me, it is really useful for your visitor to select any article that interest them if you've a lot of posts every months.

Besides, for SEO concerns, it's good to avoid some duplicate content in your blog. Just my sense.

If you want to add some extra information inside your archive page, you might want to check out the list of classic template tags.

I never know if we could do the same thing in the label view. I try to search some where but couldn't find the hacks. If you've something to share, kindly leave some comments.

That's all for now. Hope you enjoy this tips. Yeahh!!!

Klik disini untuk melanjutkan »»

Windowpaper XP - Customize XP folder

.
0 comments

Hehe..last time I've posted about how to customize XP folder background using IESHWIZ. I thought that it might be quite difficult to follow for those who are new at Win XP. No worry, this time I've found a great free software;Windowpaper XP, for you to use to customize your folder.

Windowpaper XP lets you customize the background of your folders with wallpapers in the same way, you can customize your desktop.


Other than that, it allows you to select a custom background image for any folder you want (including subfolders), specify the font color and instantly preview the results.


Check out this screenshot:-

I've tried to customize my "test" folder on my desktop using blue background and white text color. It was really easy to use this software. Just follow the step by step instruction on the right side of this software.

Step 1: Select a folder to modify (Check the checkbox to include subfolders)
Step 2: Choose a background (You can only select either using image or color)
Step 3: Choose a color for your icon text

And then, click the Folder icon beside the Default button to see a changes. If you satisfied with it, click Exit and DONE.

Klik disini untuk melanjutkan »»

Windows XP - Create one click shutdown shortcut

.
0 comments

Let’s go for XP tip for today. But before that, as you can see, I have used a custom domain for my blog. I’ve moved my blog from http://dx-xel.blogspot.com/ to http://dx-xel.net/. All of my previous blog URLs will be redirect to my brand new domain. It was pretty cool. Hehe.. Next time, I will show you step by step on how I move my blog to my own domain.


Ok, back to the topic. This is how you can create a shortcut on your desktop and when ever you click at it, your Windows will be shutdown.


Step 1

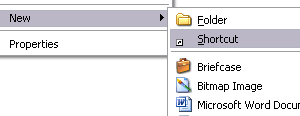
Right click on your desktop > New > Shortcut


Step 2

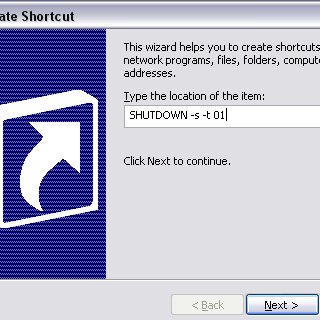
You will see a pop-up window. Enter SHUTDOWN -s -t 01

Note: Enter c:\windows\rundll.exe user.exe,exitwindows (if you’re using Windows95, Windows98 or ME)

Click the Next button and name the shortcut as Shutdown, Turn Off, Stop or whatever. Then click Finish. DONE.

Optional:

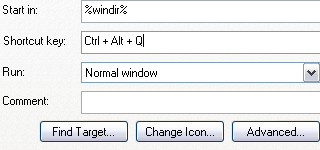
1. You can make a keyboard shortcut for that icon and by pressing them, you will be able to shutdown Windows. Right click to that shortcut icon > Properties. Click the Shortcut key’s textbox and press the combination of keys that you prefer (e.g. Ctrl-Alt-Q)

Click the Apply button and then OK.

2. You also can change the shortcut icon. (Image at the top). Right click to the shortcut > Properties and click the Change Icon… button. Select any icon you prefer, click OK. Then, click the Apply and OK button.

By now, you should be able to shutdown Windows with a single click. That’s all for today…Yeahh!!!

Klik disini untuk melanjutkan »»

Windows XP - Edit item/shortcut icon on Quick Launch bar

.
0 comments

Yea it's true, you can modify or add an item to your Quick Launch bar (image above). You can simply drag and drop the shortcut icons onto it or for some Win XP user, they prefer to open the Quick Launch folder and edit it in the normal explorer window.

Open your Run windows (Windows + R), insert %appdata%\Microsoft\Internet Explorer\Quick Launch and press ENTER.


You should be able to see the Quick Launch folder right now and you can start add, delete or modify any existing shortcut icons in it. The newly created shortcut should be reflect in the Quick Launch area in the Taskbar.


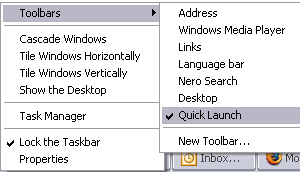
If your Quick Launch bar is not displayed, right-click an empty area on the taskbar > Toolbars and click Quick Launch.


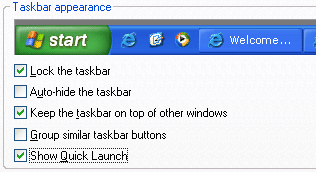
Another way to enable your Quick launch is right-click an empty area on taskbar > Properties and check the Show Quick Launch check box.

With the one click feature, Quick Launch bar makes it easy to access frequently used programs like Firefox, Media Player, your PacMan game or anything. Besides, with one click on Show Desktop icon, you can minimizes all the programs on your desktop.

I hope this tip useful for you guys. That's all....Yeahhh!!!

Klik disini untuk melanjutkan »»

Illustrator tutorial - Draw a flower

.
0 comments


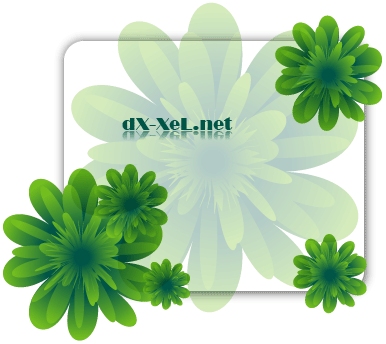
In this tutorial, I’ll show you how to draw a flower easily using the Distort and Transform effect in Illustrator. And guess what, there is totally no pen tool involved along this tutorial! This is the trick that I used to draw the Illustrator CS icon (not really looks like it). Somehow it also looks like a Sunflower for me. Hmm..

Software : Adobe Illustrator CS


Step 1

Create a New Document with 500px x 500px Artboard Setup. Select RGB color for Color Mode.


Step 2

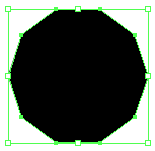
Select the Polygon Tool. Click once at the artboard and enter Radius: 70, Sides: 10.
Just fill it with black color first with no stroke.


Step 3

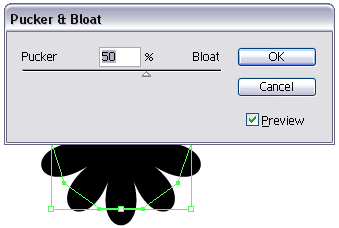
Go to Effect > Distort and Transform > Pucker and Bloat…Enter 50 and OK.


Step 4

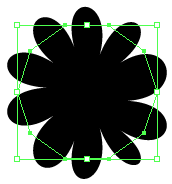
Go to Effect > Distort and Transform >Roughen…Enter Size: 10, Relative, Detail: 0 and Points: Smooth. Press OK. You’ll get something like this:-


Step 5

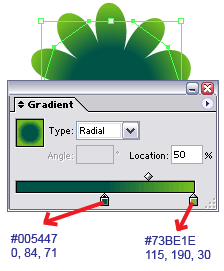
Apply a green Radial Gradient (F9) on it as below:-


Click the left slider and set Location: 50. It’s done for the first layer of our petals.


Step 6

Click on Polygon Tool once again. Enter Radius: 50, Sides: 15. Go to Effect > Distort and Transform > Pucker and Bloat…Enter 100 and OK.

You’ll get something like below:-


The Gradient effect will be automatically applied on it. Change the left slider Location: 30.

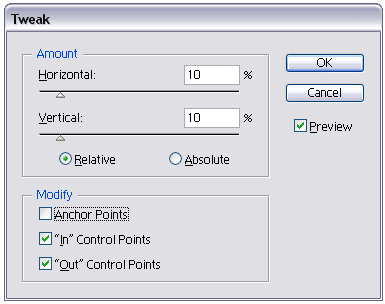
Then go to Effect > Distort and Transform > Tweak…Enter Horizontal: 10, Vertical: 10, Relative, Anchor Points: Unchecked, “In” Control Points: Checked and “Out” Control Points: Checked. Click Preview to know how its look and click OK.


Place our second petals in front of the first one:-


Step 7

Repeat Step 6 to create the next petals. Enter these values.

Polygon Tool, Radius: 30, Sides: 15.

Pucker and Bloat: 100 and

Tweak, Horizontal: 20, Vertical: 20, Relative, Anchor Points: Unchecked, “In” Control Points: Checked and “Out” Control Points: Checked. Click OK.

Set the Gradient left slider Location: 15.


And place it in front of our second petals.


Step 8

Ok, the last one. Select the Ellipse Tool or just press L. Click once on the artboard and enter Width: 40px, Height: 40px and click OK.


Then go to Effect > Distort and Transform > Zig Zag…Enter Size: 15, Absolute, Ridges per segment: 20 and Points: Smooth.


After that, go to Effect > Distort and Transform > Roughen… Enter Size: 5, Relative, Detail: 5 and Points: Corner.

Set its Gradient left slider Location: 20.


And place it in front of our third petals. Select all petals, go Object > Group.


Done for the flower.


Step 9

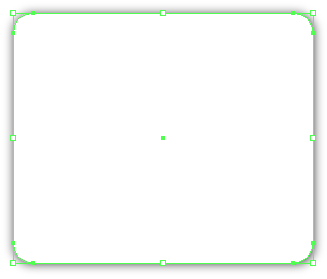
Select the Rounded Rectangle Tool. Click once on the artboard and enter Width: 300px, Height: 250px and Radius: 20.

Fill it with white color with no stroke.

Go to Effect > Stylize > Drop Shadow…Enter X Offset: 1px, Y Offset: 1px, leave everything as default as click OK.


Step 10

Right click the Rounded Rectangle > Arrange > Send to Back or just press Ctrl+Shift+[.

Place our flower to the bottom-left of the rectangle. Make the duplicate of our flower. Resize to make it bigger. Press Shift key while resizing it. Then, set Transparency (Shift+F10): Multiply and Opacity: 30.

Make another three or five duplicates and resize it to make it smaller. Place it on the top-right and bottom-right or anywhere that suits you.

Our final result:-


The flower with some other color settings:-


I hope you guys enjoy this tutorial and that’s all for today. Yeahh!!!

Klik disini untuk melanjutkan »»

Illustrator tutorial - Reflection effect on image or text

.
0 comments

Ok, today I'd like to show you how to make a reflection effect using Adobe Illustrator. As always, I'll make it step by step and with simple description. I'll use a text as example for this tutorial. Here we go!


Software: Adobe Illustrator CS


Step 1

Create a new file with any Artboard Setup and make sure you select the RGB Color for Color Mode.


Step 2

Type anything at the artboard. For example dX-Xel. Hehe..Select the text and set Size : 36 pt, Color : Orange. It would be something like below.


Step 3

Copy the text (Ctrl + C) and paste it in front (Ctrl + F). Click the text, press Shift key and drag it to the bottom of the original text (see below).


Step 4

Select the duplicate text and right click > Transform > Reflect. Set Axis: Horizontal with Angle : 0 (see below).


Step 5

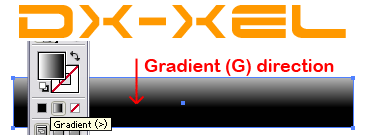
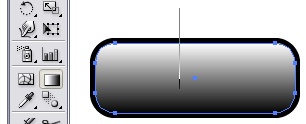
Select the Rectangle tool or just press M to draw a rectangle and place it on the top of the duplicate text. Fill the rectangle with the gradient color by clicking this tool . Select the Gradient Tool by pressing G. Press Shift + left click from top to the center of the image and release your left mouse click. See below:-


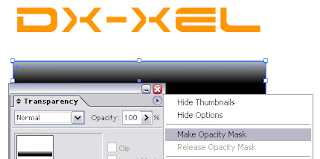
Step 6

Select the text and the rectangle image and go to Transparency palate, press the small arrow button on the right of the palette and Make Opacity Mask (see below).


That's all? Yeahh..That's all. You may move the reflect image exactly under the original one. You also can modified the Opacity value to 70%, add some background or anything. It's up to you.

Our final result:


Note: You can apply this tutorial if you want to make a reflection to an image.

Klik disini untuk melanjutkan »»

Illustrator tutorial - 5 steps to make web 2.0 button style

.
0 comments

This is the very first tutorial post in my blog. I hope you can understand what I'm talking about. I never know that making web 2.0 button was really simple and easy.


I designed all my graphics using Adobe Illustrator because of its great features. Ok, let's go!


Software : Adobe Illustrator CS

Step 1

Open you Illustrator program and create a new file. Select Size: Custom, Unit: Pixels, Width: 500, Height: 400 and make sure you select RGB Color for Color Mode. Then, click OK.


Step 2

Go to your Tools window (Window > Tools). Press D at your keyboard and then make the fill color look like this . Select Rounded Rectangle Tool and click to any place of the artboard and you will see a message box for Rounded Rectangle options. Enter Width: 200, Height: 70 and Corner Radius: 20. It would be something like this:


Step 3

Click on Selection Tool or press V and click to your image. Go to Object > Path > Offset Path and insert this value; Offset: 5 px, Joins: Round, Miter Limit: 4 and press OK. Then click at the center of the image. Now, you should get something like below:


Step 4

Apply a Gradient color on it by clicking this tool (see image below).


Then, go to Gradient Tool or press G ( while the Gradient image was still selected). After that, press Shift + left click from top to the center of the image (see below),


and release the left click,


Woww..You're almost done!


Step 5 (Final Step)

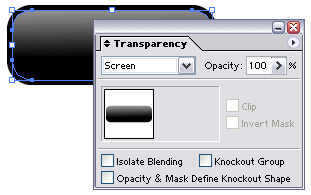
While the Gradient image was still selected, go to Transparency palate and set it to Screen (see below),


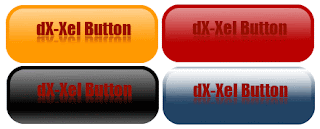
Final Button:


Congratulation! You're done!. That's all. Now you can change the black color to any of your favorite color or add some text to it.


Maybe next time I'll show you how to reflect the image or text.

Klik disini untuk melanjutkan »»
 

Blog Tutorial

Tutorial

Namablogkamu is proudly powered by Blogger.com | Template by o-om.com