

In this tutorial, I’ll show you how to draw a flower easily using the Distort and Transform effect in Illustrator. And guess what, there is totally no pen tool involved along this tutorial! This is the trick that I used to draw the Illustrator CS icon (not really looks like it). Somehow it also looks like a Sunflower for me. Hmm..
Software : Adobe Illustrator CS
Step 1
Create a New Document with 500px x 500px Artboard Setup. Select RGB color for Color Mode.
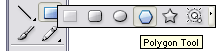
Step 2
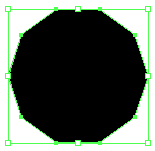
Select the Polygon Tool. Click once at the artboard and enter Radius: 70, Sides: 10.
Just fill it with black color first with no stroke.
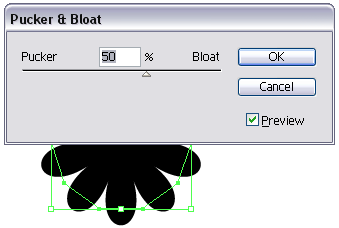
Step 3
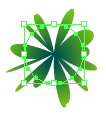
Go to Effect > Distort and Transform > Pucker and Bloat…Enter 50 and OK.
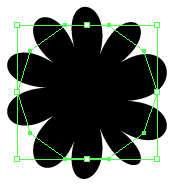
Step 4
Go to Effect > Distort and Transform >Roughen…Enter Size: 10, Relative, Detail: 0 and Points: Smooth. Press OK. You’ll get something like this:-
Step 5
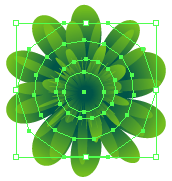
Apply a green Radial Gradient (F9) on it as below:-
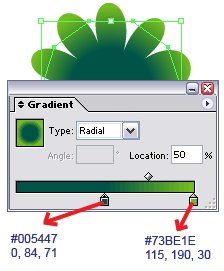
Click the left slider and set Location: 50. It’s done for the first layer of our petals.
Step 6
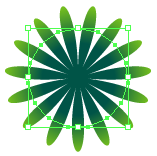
Click on Polygon Tool once again. Enter Radius: 50, Sides: 15. Go to Effect > Distort and Transform > Pucker and Bloat…Enter 100 and OK.
You’ll get something like below:-
The Gradient effect will be automatically applied on it. Change the left slider Location: 30.
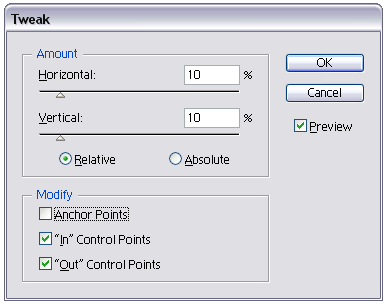
Then go to Effect > Distort and Transform > Tweak…Enter Horizontal: 10, Vertical: 10, Relative, Anchor Points: Unchecked, “In” Control Points: Checked and “Out” Control Points: Checked. Click Preview to know how its look and click OK.
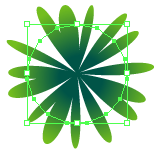
Place our second petals in front of the first one:-

Step 7
Repeat Step 6 to create the next petals. Enter these values.
Polygon Tool, Radius: 30, Sides: 15.
Pucker and Bloat: 100 and
Tweak, Horizontal: 20, Vertical: 20, Relative, Anchor Points: Unchecked, “In” Control Points: Checked and “Out” Control Points: Checked. Click OK.
Set the Gradient left slider Location: 15.
And place it in front of our second petals.

Step 8
Ok, the last one. Select the Ellipse Tool or just press L. Click once on the artboard and enter Width: 40px, Height: 40px and click OK.

Then go to Effect > Distort and Transform > Zig Zag…Enter Size: 15, Absolute, Ridges per segment: 20 and Points: Smooth.

After that, go to Effect > Distort and Transform > Roughen… Enter Size: 5, Relative, Detail: 5 and Points: Corner.
Set its Gradient left slider Location: 20.

And place it in front of our third petals. Select all petals, go Object > Group.
Done for the flower.
Step 9
Select the Rounded Rectangle Tool. Click once on the artboard and enter Width: 300px, Height: 250px and Radius: 20.
Fill it with white color with no stroke.
Go to Effect > Stylize > Drop Shadow…Enter X Offset: 1px, Y Offset: 1px, leave everything as default as click OK.

Step 10
Right click the Rounded Rectangle > Arrange > Send to Back or just press Ctrl+Shift+[.
Place our flower to the bottom-left of the rectangle. Make the duplicate of our flower. Resize to make it bigger. Press Shift key while resizing it. Then, set Transparency (Shift+F10): Multiply and Opacity: 30.
Make another three or five duplicates and resize it to make it smaller. Place it on the top-right and bottom-right or anywhere that suits you.
Our final result:-
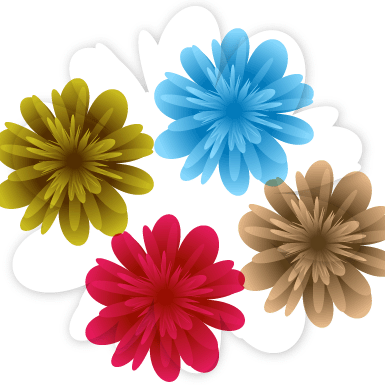
The flower with some other color settings:-
I hope you guys enjoy this tutorial and that’s all for today. Yeahh!!!


0 comments:
Post a Comment